Showing posts with label recycling. Show all posts

Tuesday, September 18, 2012

Watching the birds - playing around

When I saw what my hands had played with while exercising free motion machine embroidery, I had to laugh: somehow it made me think of the early morning arguments with my teenage son ;-)!


Using very simple outlines, a bit like childrens' drawings, makes it possible to transfer the forms into almost every material.

I liked the look of these birds and pondered upon how to make a brooch with the motif - while experimenting, I came up with this:


The bodies are cut out of discarded plastic cards (same stiffness as credit or club cards), covered with patterned washi tape. In good old malfatto manner, I just attached the broche needle and other metal wire components with duct tape.

Bits of wire - sometimes combined with scoubidou strings - and some beads for embellishments made the rest.

(German summary: Zwei Variationen von Vögel, einmal genäht/maschinengestickt, einmal als Broschen mit Recylingmaterial.)


Tuesday, August 7, 2012

A little leisure: Sweet mushroom

While sewing and cutting and stitching, I realize I'm suffering from a constant lack of pin cushions - not a single one in sight when I need them! The small ones I did last year always seem to have disappeared without a trace ...

And from time to time it's nice just to play around and do some little thingy, nothing serious, just a spontaneous malfatto project in between!

And so I took a break and made myself a sweet mushroom by recycling a small plastic container which had held some screws. For the filling I used a handful or two of all those threads and fabric scraps laying around on my working table, but first I did put in a couple of small pebbles from the garden as a bottom weight, as this mushroom is a bit taller than usual and I didn't want it to tumble.


Every part of this pin cushion is recycled - some small leftovers from earlier embellishing projects, which I punched together with the embellisher along with some coloured scrim (used for cleaning up while dyeing!) to get a slightly larger piece - then a bit of free motion machine stitching - and a few centimeters of a really kitschy ribbon and some plastic confetti (!) which were easy to poke a hole into with the needle and to use as flower sequins.


It even fits into my little mobile sewing kit!

(German summary: Anscheinend leide ich an ständiger Nadelkissen-Not - auf jeden Fall macht es Spaß, zwischendurch so ein kleines Dingsbums aus den Resten zu fertigen, die da am Arbeitstisch herumliegen ... Ein Plastikdöschen, ein paar Zentimeter kitschige Borte, ein paar Filzfuzelchen, am Embellisher zusammengepuncht, zur Füllung einige Steinchen aus dem Garten und eine Handvoll Woll- und Stoffschnippelchen vom Arbeitstisch - und fertig ist das Schwammerl!)

Saturday, April 21, 2012

Going green

Ah - gardening season is here!

Although I keep spinning in the evenings, there isn't too much to show there yet - I keep exercising, trying to get it up on the next level ...

And preparing the garden for the season to come takes its time.

If you are running out of seed starting pots for your plants - like I was - you can always make some yourself by recycling old newspaper.


Here you will find a YouTube tutorial on how to make your own seed pots.

Sunday, February 26, 2012

Sustainable everyday favourites

As I'm always looking for sustainable everyday items myself, I thought I'd share some of the things I've found and use in everyday life with you. And I would love to learn about your favourites!

Almost every evening, I light my recycling candle - it has a permanent glass fiber wick and is fed with scraps of wax and candle leftovers. (Here is the link to the manufacturer.)


The soap foam pump is another one of my favourites: with only a very small amount of any liquid soap - and a lot of water from your cold water-tap - it produces soft soap foam, nice to your skin, nice to the environment and nice to your wallet.


Two months ago I stumbled upon this link and this other link and decided to try out sewing and wearing my own fabric panty liners. I admit I was a bit sceptical at first, but now - after several weeks of use - I sure am a believer: wonderful to wear, easy to sew, and a very good, sustainable alternative to the disposables ones.

(If you don't want to sew yourself, there are several sellers at Etsy who'll do the job for you - here's the link.)


While recycling your old flannel sheets and shirts for the panty liners, you can use the fabric scraps for making your own cotton rounds as well - when used, I simply throw them in a small laundry bag hanging in a corner of the bathroom, and wash them together with the towel and bed linen laundry.


(Of course there are sellers for these things too at Etsy, if you don't feel like sewing and recycling yourself.)

(German summary: Da ich immer selber auf der Suche nach nachhaltigen und umweltfreundlichen Alltagsdingen bin, wollte ich hier meine Favoriten vorstellen - welche sind Deine?)

Saturday, December 17, 2011

Small Xmas project III: Christmas ornament star/Weihnachtsprojekt III: Recyclingsterne


Almost a year ago, I found a tutorial on this beautiful Christmas ornament star at Pam's blog 'Gingerbread & Snowflakes' (if you click it, you'll be right there) - and although I tried them out right away, I thought I'd wait to show them to you until Christmas :-).

As soon as you've managed to do your first, it's an easy job, and the best thing about it is that you will most certainly find all (recycling) materials at home already - composite cardboard (like the brown one, for boxes), pins, beads, some leftover yarn or thread and bits of paper, maybe some small bits of decoration material to glue to the center.

Of course you could use a photo in the center too, and make gift tags out of them - they even look neat on the backside!

Thanks, Pam!

(German summary: Diese netten Recyclingsterne - man braucht nur etwas Verbundkarton, ein paar Stecknadeln und ein paar Garnreste - habe ich schon im Frühjahr entdeckt und nachgearbeitet - in Pam's blog
'Gingerbread & Snowflakes' gibt es die ganze Anleitung!)

Sunday, December 11, 2011

Small Xmas project II: Felt ornament/Weihnachtsprojekt II: Filzhänger

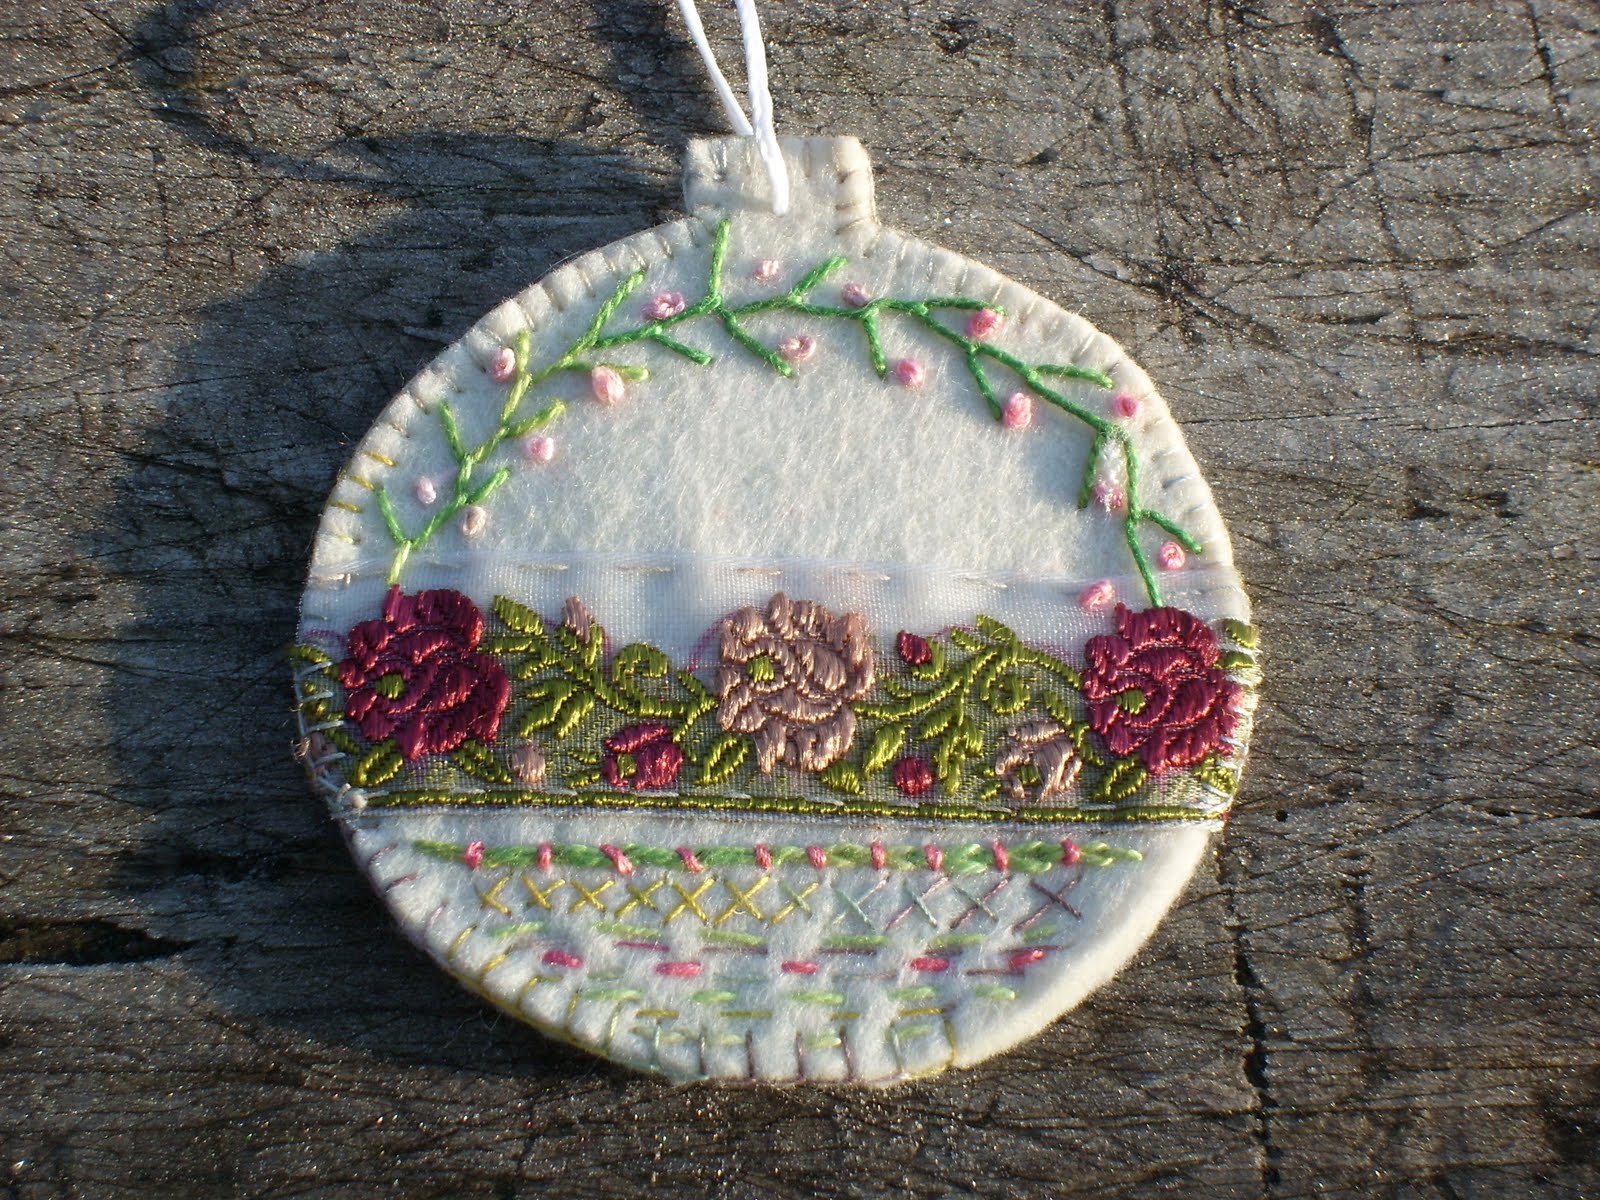
What can you do with some scraps of white felt, bits of ribbons and lace? Well, a Christmas ornament, of course!

The felt I used for this was quite a sturdy one, actually a piece of a table placemat, and so it will hang nicely, no backing needed.

A little bit of ribbon and some handstitching, and it could turn out like this:


For the decoration of the second one I used different bits of lace and sewed them down with free motion machine stitches - but of course you could do it all by hand as well:


I guess there are endless ways of using tablemat felt in various colours for making ornaments - maybe also in combination with paper (what about photos?) or fabric ... could be adapted for a kids' project as well, I think!

(German summary: Ein Stück festen Filz - hier von Tischsets - und Reste von Borten, Bänder und Spitze - und Simsalabim! - hat man einen Christbaumschmuck!)

Wednesday, November 30, 2011

Another sleeveless vest!/Noch einen Pullunder!

Yes, I enjoy this way of knitting very much - this time, I tried doing a more graphic pattern in a colour scheme which I have never chosen before.

As I'm just knitting strips with quite few stitches at the time, I prefer using (wooden) double-pointed sock needles. The finishing rows at neck and arms are crocheted, and for the waistband I then needed a circular knitting needle, of course.


This vest is actually a de-stasher, as most of the yarn was either found in my stash or reclaimed from another garment - I only bought one single ball of sockwool yarn to get a bit of glowing turquoise into it!


A clever thing about knitting strips is that you don't have to worry about gauge and measurements until you've been knitting for quite a while - then there's still time to layer it onto one of your favourite sweaters and compare sizes.

Another advantage of this piece-work is that you can knit it almost entirely on sock needles - even knitting two strips parallel, if you want. The striping itself helps you count the rows easily when comparing lengths and sewing it all together.

And furthermore, the strips make it possible to re-arrange the design and the order of colours till the very end - you can even turn them upside down before mounting!

(German summary: Mir gefällt diese Art, Streifen zu stricken, sehr gut, da man wirklich bis zuletzt die einzelnen Teile neu arrangieren und ergänzen kann. Die Strumpfstricknadeln machen die Arbeit sehr handlich, und auch das Kombinieren verschiedener Wollreste- und stärken ist hier kein Problem!)

Sunday, November 20, 2011

Bottlecap recycling/Flaschenverschlüsse recyceln

I guess you know me by now - and that I have a faible for recycling things, especially if they come in some form of textile context.

Finding recycling possibilities for beverage cartons/tetrapaks or PET-bottles isn't even that hard - but for quite some time now I've been looking for a good solution on what to do with those bottlecaps.

And finally I've found one - it's provided by Jen Segrest, alias 'verybigjen', who turns them into sweet, tiny pincushions of all sorts - here is the link to her very clear tutorial on flickr.

So below you can see the ones I made - don't you think they would make a nice, small gift for X-mas? Really easy to do and you can use the tiniest of scrap supplies! And - they really come in more handy than you might think: I'm using mine all the time now!


(German summary: Schon lange habe ich überlegt, was man mit den vielen Flaschenverschlüssen machen könnte, die sich so ansammeln. Bei
'verybigjen' auf flickr gibt es eine einfache Anleitung, wie man daraus winzige Nadelkissen machen kann - genial! Vielleicht als ein nettes, kleines Geschenk?)

Tuesday, November 15, 2011

Deep down the dustbin .../Fasermonster-Familie


... there once lived a fiber monster - although I never knew.

One day, it popped out of the bin and layed down under the needle foot of my embellisher.

Then it had a full service beauty surgery and became a bookmark.

Nice, huh?

(German summary: Wer hätte denn gedacht, daß sich ein Lesezeichen-Monster im Papierkorb versteckt? Ein bißchen 'Schönheitschirurgie' am Embellisher, und schon war's geschehen!)

Tuesday, November 8, 2011

Reclaimed wool: Indoor boots/Haussocken aus Recyclingwolle

Another good idea for using your reclaimed wool (or leftovers), is making house boots - a crocheted mixture of socks and slippers, which my daughter and I are using constantly. They are warm, soft and don't get lost under the table - and you can even drop them in the washing-machine from time to time.

For this latest pair of boots I used a reclaimed worsted wool yarn for the base and topped it with some fancy leftovers of fringe yarn - I even decorated them with a dear head which I cut out from a piece of brown felt.


End of summer, I crocheted these two pairs the same way - reclaimed yarn and leftovers again, however in some acrylic wool blends.


As usual, I didn't really have a pattern, but if you zoom up on the pictures, I think you get the idea:

Starting circular at the toes, crocheting a flat round for a couple of rows (put a marker at the beginning, so you can see where a new row starts).

At about 5 cm diam. increase less frequently, thus allowing the flat piece to curl up to a 'bowl' - when the 'bowl' covers your toes nicely (about 32 sts), stop increasing and proceed crocheting in rounds until you reach your ankle (about 13 cm medium female size).

Now leave a gap of about 12 cm in the front and work front and back rows, turning at the gap.

Continue until you've reached your heel (about 12 cm medium female size), split the back by working a couple of short rows to produce a rounded heel. Leave a long tail of your yarn to close up the heel with a few stitches from the inside of the boot.

If you like an open shoe, you could stop here, just crocheting a last row around - but I must say I do prefer crocheting a shaft, making it more like a boot - it looks 'younger' and less Granny-like - and I find it fits better on the foot as well!

So just go on crocheting for about 6 or more rows, skipping the corner stitches on both sides in each round. In the last row, crochet 15 chain sts for a loop at the back - this is great for hanging the boots, for putting them on - and it looks cool, too!


I used a 6 mm crochet hook and either worsted weight yarn or 2-3 strands of thinner yarn - but you take whatever you have and don't feel afraid to try it out!

A good idea would be, however, to divide your yarn into two similar heaps (you can put it on a scale) before you start, and to work both boots more or less simultanously - when you work without a pattern, this is to ensure that both boots will look the same in the end :-)!

(German summary: Noch eine nette und nützliche Art, seine Rest- oder Recyclingwolle zu verwenden, ist Haussocken- oder -stiefel zu häkeln. Das geht sehr einfach: ein Käppchen für die Zehen, dann gerade aus in Runden bis zur Fessel, aufgezogene Sohle in Hin- und Rückrunden bis zur Ferse, Arbeit teilen und ein paar verkürzte Runden häkeln, zusammennähen, Öffnung umhäkeln, bis ein Schaft entstanden ist, kleinen Henkel hinten mittig arbeiten.

Ein guter Tip ist aber, wenn man frei häkelt, daß man anfänglich die Wolle in zwei gleiche Teile aufteilt und die beiden Stiefel mehr oder weniger gleichzeitig arbeitet - damit sie am Ende auch wirklich gleich werden :-)!)

Sunday, November 6, 2011

Reclaimed wool: Sleeveless vest/Pullunder aus Recyclingwolle

I like yarns. And I like repurposing things. So the idea of reclaiming yarn from non-fitting garments laid close at hand.

When I was given two bags full of hand-knitted garments which I didn't want to wear as they were, I decided to unravel them and use the wool for some new projects.

Out of an unravelled shoulder cape, I knitted this sleeveless vest -


I didn't really use a pattern, just knitted strips and sew them together, taking measure from one of my old vests.

I like knitting the front and the back the same - so I can wear it both ways.


When you've unravelled an old garment, it's important that you wind it to a skein, soak it in lukewarm water (I used a bit of soap too), rinse it thorougly and then dry it, eventually with a weight, in order to straighten out the 'curls' of the former knitting. If you don't, your new knitting will get uneven and ugly.

Shake the skeins several times while they are drying, and you will get an airy and fluffy yarn, good as new!

(German summary: Da mir sowohl Wolle als auch Recyling am Herzen liegt, ribbele ich gerne nicht mehr getragene Stricksachen auf und stricke daraus etwas Neues. Wichtig ist, daß man das aufgeribbelte Garn zu Strängen wickelt, und es dann im lauwarmen Wasser - auch mit Seife - badet, dann spült, trocknen läßt - evtl. mit einem Gewicht - damit sich die 'Wellen' glätten und die Wolle wieder ein schönes Maschenbild ergibt. Mehrmals ausschütteln, ausschlagen - und das Garn ist wie neu!)

Wednesday, September 28, 2011

Chopping up shirts/Mit Hemd, Pullover und Krawatte ...

Although end of September, it's still warm outside, so I can work in the garden.

I'm chopping up four men's shirts which I found at the parish flea market last weekend. One of the shirts is solid natural linen - mmm, this means lots of embroidery fabric ...

The other ones are heavy cotton - I chose them for the texture and for the faded colours. Maybe they would work well as a frame for my deer project?


I also have some broad men's neckties in my stash - and when using my little bias former/tape maker (Prym) the other day, I suddenly remembered that most ties are cut diagonally - what if I'd use them for making unusual bias bindings? They could look quite nice - and it would be repurposing and at the same time saving time and effort, when I don't have to prepare those fabric strips first ...


I bought a big mens' sweater at that flea market too - the price was 1 Euro! It's 75% cotton and the colours are off-white with a touch of brown inbetween, machine knitted in stockinette, the yarn consisting of three threads - two of them are straight cotton, the third one is a bit of a moderate bouclé.

As the seams are cut and overlocked, unravelling means getting a lot of ends - which is quite bad for knitting, but good for sewing. The straight natural white/light beige cotton threads will give me loads and loads of threads to handsew with - it's the perfect colour and the perfect thickness!


So, what are you waiting for, ladies? Hubby's not around? Where are those scissors ...?

(German summary: Am Flohmarkt habe ich einige feste Herrenhemden billig erstanden - guter Stoff, gute Farben - zum Nähen, Embellishen und Sticken - dann noch die Idee, aus alten, breiten Krawatten Schrägbänder zu nähen - und die einzelnen Fäden eines Baumwollpullovers für's Handnähen zu verwenden ...)

Tuesday, July 12, 2011

Mini Summer Project I: Brooch/Kleines Sommerprojekt: Brosche

While sitting in the garden and chatting with my Mum, I worked on this small brooch -


- all by hand and with scrap materials found in my glass jar. I think it looks a bit folkloristic Scandinavian, especially with this white blouse.


(German summary: Nur eine kleine Brosche mit Material aus dem Resteglas, das ich gemacht habe, während ich plaudernd mit meiner Mutter im Garten gesessen bin - ich finde, es hat etwas Skandinavisches, oder?)

Sunday, June 26, 2011

Literally modern times/Klassische Literatur modern

Question: How do you get your kids off the computer and into reading classical literature instead?

The answer is simple: You buy them an e-book reader and make them a nice cover for it! (Bold decision for me, being a part time librarian!) But indeed, my daughter spent several hours today out in the garden, reading ...

And for the homemade cover: this is the front -


- and here's the back (usable the other way round as well):


And for a young mister, I made a wristband this weekend out of a piece of an used truck tyre and some old adjustable resistance out of my stash - quite cool recycling, isn't it ? (Do you now begin to imagine what my stash looks like ;-) ...)


(German summary: Und wie bekommt man seine Kinder weg vom Computer und hin zur klassischen Literatur? - Man kauft ihnen ein e-book reader und bastelt ihnen eine hübsche Hülle dafür ... Bei uns war's auf jeden Fall ein voller Erfolg! Ein Armband aus einem gebrauchten LKW-Reifen und einem alten einstellbaren Widerstand gab dieses Wochenende dann auch her.)

Wednesday, May 25, 2011

Red deer crossing/Rotes Kreuzreh


'Not doing it properly' - but bending the rules - is another way of setting creativity free, I think.

Take cross-stitch for example. We've all been taught to sew it neatly row-wise, stitches in one direction only, same size allover. What if you don't?

If you just regard them as stitches, ment for filling a space, covering a background, producing a colour field or even just lighter and darker areas - then it doesn't really matter what size they are, in which direction they're looking, if they're overlapping or not. On the contrary: variety will add further interest.

The yarn I used for this deer is real recycling stuff: I found it when enravelling an old cord and tassel ...

(German summary: Einen Stich nicht akkurat auszuführen kann manchmal sehr belebend sein :-). Wenn man z.B. den Kreuzstich als Flächenfüller, Bodendecker, Farbenmaler sieht, ist die Stichlänge, -größe, -anordnung plötzlich sehr nebensächlich ... Die Fäden, die ich hier verwendet habe, sind übrigens hauptsächlich der spannende Inhalt einer alten Kordel ...)

Friday, May 20, 2011

It's just another cat, my deer!/Raubtierhirsch

Funny enough, it seems as if the scrappiest of scraps boost my imagination the most!

This is today's deer, where I had to assemble three outline patches (and even add a bit of additional drawing) to achieve one animal.


Here you can see the three fragments joined:


I found a piece of wildcat fabric in my stash and decided to use it for the body.


Then I took a clear plastic envelope for tracing the outlines - this way I could see where to position the eye best:


The beads on neck and back are not only embellishments, but also help holding the fabrics together.

And as I seem to be in a creative upswing right now, I made this ring for myself today as well - it's basically a piece of black rubber, some natural beads (coral and bone) and a platinum covered metal bar with a removable knob.


(German summary: Je anspruchsloser die Reste, umso mehr wird anscheinend meine Experimentierlust angestachelt! Drei Reststücke und etwas Raubtierstoff bilden heute das Gerüst meines neuen Hirsches - dann noch ein paar Perlen und Metallpailletten für's Geweih ... Ja, und der Ring kam heute auch noch zustande: Gummi, Naturperlen und ein Steg mit abschraubbaren Verschluß.)

Wednesday, May 18, 2011

Oh deer! Fabric Wildlife/Rotwild im Musterwald

A friend sent me some scraps of a cotton fabric, which had the outlines of different deers printed on it.

And like in a drawing book, these outlines just asked to be filled in with colour ...

I chose strands of cotton threads and some light weight fabrics from my stash palette - the pictures show work in progress, of course.


Furthermore, these gorgeous linen-blended wool strands are hand-dyed by Dornröschen and now waiting for me in a basket beneath my spinning wheel ...


And - I've bought myself a new pair of shoes ... running gear, almost like walking barefoot!


(German summary: Die Konturen dieses Stoffes haben richtiggehend nach Farbe und Inhalt gerufen - ich verwende Moulinégarn und dünne Stoffreste dazu. - Spinnfutter von Dornröschen - diesmal eine neue Mischung, mit Leinen! Und dann habe ich mir noch ein paar neue Schuhe gekauft ... fast wie barfuß laufen!)

Sunday, May 15, 2011

Stitching flowers/Blumenstickerei


I've done a bit of stitching again lately - actually it's a combination of different techniques:

first, I used my embellisher to needle-felt some scraps of different novelty yarns to the pre-felted green background, then I did some embroidery on it, partly with woolen threads, partly with hand-dyed cotton ones - then I used my embellisher on it again - and finally I added a couple of fabric mini yo-yos, which I made out of fabric scraps and then sew on to the center on some of the flowers.

I'm not yet quite sure how to proceed with this - maybe I'll use it for a book cover.

(German summary: Ein kleines Werkstück mit einer Kombination verschiedener Techniken - Trockenfilzen mit dem Embellisher, Handstickerei und ein paar Mini-Rosetten, die ich mit dem Yo-yo-maker gemacht habe - der Hintergrund ist ein Stück grüner Vorfilz.)

Monday, May 9, 2011

Pin cushion ring/Fingernadelkissen


I made a great invention today ... a pin cushion ring! (Yes, I know, there might be others - but this is mine! :-)

The idea struck me when I was about making a pin cushion on a jam jar - as a matter of fact, I am one of the few persons out there who has hardly got any decent pin cushions, although I sew regularly, both by hand and on the machine.

And when I'm sitting outside in my garden, sewing or embroidering, I never know where to put those cut-offs - don't want to throw them on the ground, neither put them in my coffee cup ... Therefore I need the jar: first to hold thread and scissors, then to collect the cut-off threads and fabric snippets.

Both pin cushions were glued on with a hot glue gun - one to the jar lid, the other one to a simple copper ring I had laying around.


And while working, I thought I could as well make a third one - it's a personal version of the flower pin cushion, I just added an extra cushion on the top, in order to separate the sewing needles from the normal pins.

(German summary: Und ich dachte, ich hätte eine neue Erfindung gemacht, mit dem Fingernadelkissen ... :-)! Auf jeden Fall habe ich jetzt sogar drei verschiedene Nadelkissen parat - jedes erfüllt seinen besonderen Zweck auf unterschiedlicher Weise.)

Sunday, May 8, 2011

A Japanese Knot Bag/Eine japanische Knotentasche

I found a nice vintage fabric in my stash recently, and decided to sew one of those Japanese knot bags out of it.


For the lining, I used a scrap piece of striped cotton fabric, which had been in my stash for ages at well.

I'm quite pleased with how it looks, but as the vintage fabric I used is rather heavy, I think I'm going to make the long strap a bit more narrow so that it will be laying smoother on my shoulder.


I would also like to make another one, lengthening the strap to reach diagonally over the chest and using a medium weight cotton fabric instead.

If you would like to sew a knot bag yourself, the pattern I found when googling about it is here - the explications are in German, but with clear pictures and a scale pattern. You'll find a smaller 'handbag' version with instructions in English here.

(German summary: So, jetzt habe ich mir auch eine japanische Knotentasche genäht - ein genial einfacher Schnitt, geringer Stoffverbrauch - man könnte auch Reste zusammennähen - und sehr praktisch!)