Sunday, March 27, 2011

Sewing a fabric basket out of scraps/Ein Stoffbehälter aus Resten

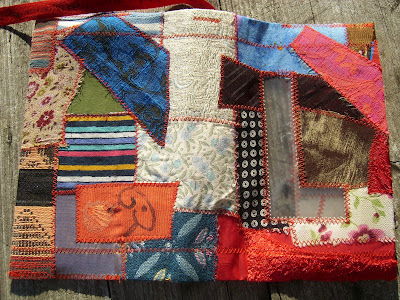
The idea of sewing storage bags out of scrap fabric is not new - but still brilliant, and I wanted to try that out. As you can see, I even added some pockets to the outside, which can hold pens and all sorts of tools.


The only thing you need is fabric and/or scraps which you sew together, maybe on a larger piece of waste cloth - and some kind of batting: in this case I recycled an old mat from my ironing board, but instead of buying new interlining you could f.e. make use of a worn-out sweater, a towel or a thin blanket - or several layers of fabrics you want to get rid of :-).

A pair of old jeans would make a wonderful big basket for toys or even fire wood, I think!

Anyway, you should end up with a rectangular piece of scrap fabric, fold it in the middle and sew the short ends together to receive a kind of broad pocket.

The trick about producing a basket or a bucket out of this is to sew a seam in a right angle across the edges to achieve a bottom - this is also often used to get that third dimension to bags of all kinds.

If you feel you need a solid pattern to do this, you can buy one from one Etsy (one example is designsmayamade, who makes them out of burlap and with handles) - and if you just want the buckets without having to sew yourself, I suggest you visit the shop of roxycreations.

(German summary: Mir gefällt die Idee sehr gut, aus Stoffresten auch Behälter nähen zu können - Behälter kann man ja immer brauchen. Der Trick ist, einfach die Ecken großzügig im rechten Winkel abzunähen, um einen Boden zu bekommen - ähnlich wie auch bei Taschen aller Art.)

Sunday, March 20, 2011

Scandinavian wrist warmers with tin thread embroidery/Skandinavische Pulswärmer mit Zinnfadenstickerei

Another deep dive into my stash ... and what I found this time was some curly sheep fur, some tin thread, bone, metal and glass beads, and some small pieces of fulled cloth - very, very soft, probably with angora ...

I just couldn't resist sewing these small bits together to wear as wrist warmers!


I used another bit of sheep skin - also very soft and this time without curls - as an appliqué for the leaf, then couched the tin thread with a silver metal thread for the borders of the leaf.

Tin thread embroidery - which is a couching stitch - has a long tradition in Scandinavia, often used by the Sami people on reindeer skin. The 'naked' sheep skin I used here has the right 'look', I think.


The red borders, which I layered in between while sewing, are just waste cut-offs - but I found them being most decorative for this project!

The wrist warmers are not lined with the fur - I only had very narrow strips of it (waste material as well), which i sew under the edges to complete the Scandinavian touch!

(German summary: Noch ein paar Schätze aus meinem Fundus - diesmal entstanden ein paar Pulswärmer aus den Walkstoffresten, Pelzstreifen, Zinnfäden und Perlen!)

Friday, March 18, 2011

A lace collage needlebook/Ein Nadelbrief aus alten Spitzen

Finally, I've come to the conclusion that it is now time to use the treasures in my stash - not just collecting them ...

Maybe the situation is familiar to you as well: You keep collecting and piling beautiful material, spending quite some time organizing and stashing your treasures (and if you're not too organized ;-): searching for certain items you know should be there somewhere) - and of course this is a pleasure itself, sometimes ...

but just having reached the break-even point of my lifetime, I'm now convinced that I want to use and have fun with these things, rather than collecting a lot more of them ...

So I took a dive into my beloved stash and found a box of vintage lace - and decided to make a 'Victorian' needlebook especially for my embroidery needles ...

It's not finished yet - I still want to add some beads - but this is the back so far:


- and the front:


(German summary: Ich habe mich entschlossen, daß jetzt die Zeit gekommen ist, wo ich meine gehorteten Schätze auch verwenden möchte, nicht nur mehr sammeln und horten ... Hier ein geräumiger Nadelbrief aus alten Spitzen, extra für meine Sticknadeln - noch in Arbeit, da ich die Spitzen mit mehr Perlen befestigen möchte.)

Sunday, March 13, 2011

A Millipede Moebius/Ein Tausendfüßler-Möbius

Spring is slowly coming, still the mornings and the evenings are cold enough here ... I felt I needed something warm and cheerful for my neck - and for my mind.

So I decided to crochet a colourful shawl - bright and sunny, almost a bit of a warming necklace - to chase away the last greyish shades of winter.


This turned out to be a fast and funny way to crochet a shawl - using a big No. 10 mm hook, a chunky rainbow coloured yarn which I found in my stash, working 150 crochet chain sts which I connected moebius-wise to a loop - then crocheting two rows of double crochet sts. Now the 50 g ball of this yarn was used up, and I continued with double sock yarn in similar colours, working a row of half double crochet sts all the way round my moebius.

For the last round, I crocheted 10 chain sts, turned, worked a single crochet st in the following 9 sts to produce a 'tail', 1 slip st to the base, 4 single crochet sts inbetween and then again 10 chain sts etc, continuing this way all around.

Very easy and fun to do - and if you don't have that kind of chunky yarn at home, you can easily replace it with two or three strands of sock yarn or other light weights.


(Looks a bit like a millipede, doesn't it :-)?

It's long enough to wear three or even four times around your neck, but of course you can let it hang loosely, like a double necklace, too.

(German summary: Da der Frühling nur sehr zögerlich voranschreitet, habe ich mir doch noch einen neuen, bunten Schal gehäkelt - als Möbius-Variante, mit einer sehr dicken Häkelnadel und dicker, bunter Wolle - wie eine wärmende Halskette!)

Wednesday, March 2, 2011

Scrap fabric on paper/Stoffschnipsel auf Papier


A short while ago, I found an interesting idea how to find use for the tiny fabric scraps I use to collect in a glass jar on my working table.

Take a piece of craft paper - or a paper grocery bag - cut it flat the size you desire, then arrange those tiny scraps of fabric and trims onto the paper, sticking them to the paper with a bit of glue stick or PVA glue. You don't have to glue very accurately, just enough to keep the scraps in place.

When the glue is dry, you might want to iron the collage - sandwich it under a sheet of newspaper to keep your iron from getting sticky.

Then use your sewing machine and a zigzag seam to complete the collage. Now you have a fabric paper sheet.

At Mamume's blog (in German), where I first found this idea, she uses this sheet for cutting it up into tags, which is a great idea - but I think this material is sturdy enough to be used for something more lasting, like for a book cover for example.

This is a book cover which I made as a birthday present for a friend:


As I wanted the title of the book to show through, I cut out a 'window' in the fabric with a craft knife and replaced it with a piece of clear plastic from a transparent envelope.


I also added a cotton ribbon for a bookmark and an elastic ribbon for holding book and cover shut.


Another use for this 'new' material would be to sew a kind of document bag out of it,


closing it with a zipper or a velcro strip.


(German summary: In
Mamume's blog (auf Deutsch) habe ich eine nette Anleitung gefunden, wie man kleinste Stoffschnipsel auf Papier aufnähen kann - und gleich sind mir ein paar weitere Ideen gekommen, wie man diesen 'neuen Stoff' auch noch verwenden könnte ...)