Saturday, December 24, 2011
Small Xmas project IV: Nativity scene ornament/WP IV: Baumkrippe

If you happen to have a plastic laminator at home, this is a funny way to keep your kids (and even yourself!) happily entertained while waiting for Christmas ...!
Draw - or make your kids draw - (well, I found my pictures in a magazine) - the persons, animals and items needed for a nativity scene, cut them out, decorate them with sequins and glitter glue, let dry and then put them into the plastic laminating pockets with a bit of space between the figures.
When you've laminated them and cut them out once more (leaving a bit of plastic all around the border), punch an eyelet ring at the top and add a bit of string to hang them.
Leaving you with this for now, I wish you all a very MERRY CHRISTMAS!
(German summary: Mit einem Laminiergerät und gezeichnete Krippenfiguren - vielleicht noch etwas Glitzer und Pailletten - läßt sich ein recht lustiger Baumschmuck machen! Und ganz herzlich: FROHE WEIHNACHTEN!)
Tuesday, December 20, 2011
Small Xmas-project IV: Crocheted star garland/Weihnachtsprojekt IV: Girlande aus Häkelsternen
If you happen to have an evening left - and some bits of sockwool - you could still make a small star garland for yourself or for a friend ...

I found this very easy-to-follow tutorial on Ellen Bloom's blog - though instead of acrylic, I decided to use some leftover variegated sockwool, both 4-ply and 6-ply, with a crochet hook 3,5 mm - and I spaced them a bit more, about 25 chain stitches inbetween, as I didn't have the time to make that many ...
My 4-ply stars are about 4,5 cm, the 6-ply about 5,5 cm big - so this is a small and sweet garland - but of course you can use whatever yarn you have stashed.

And if you don't find the time now, remember there will be a new Christmas time next year!
(German summary: Eine feine und doch einfache Häkelanleitung für kleine Sternchen habe ich auf Ellen Bloom's blog gefunden - mit Sockenwollresten schauen sie noch einmal so süß aus, finde ich!)
Saturday, December 17, 2011
Small Xmas project III: Christmas ornament star/Weihnachtsprojekt III: Recyclingsterne

Almost a year ago, I found a tutorial on this beautiful Christmas ornament star at Pam's blog 'Gingerbread & Snowflakes' (if you click it, you'll be right there) - and although I tried them out right away, I thought I'd wait to show them to you until Christmas :-).
As soon as you've managed to do your first, it's an easy job, and the best thing about it is that you will most certainly find all (recycling) materials at home already - composite cardboard (like the brown one, for boxes), pins, beads, some leftover yarn or thread and bits of paper, maybe some small bits of decoration material to glue to the center.
Of course you could use a photo in the center too, and make gift tags out of them - they even look neat on the backside!
Thanks, Pam!
(German summary: Diese netten Recyclingsterne - man braucht nur etwas Verbundkarton, ein paar Stecknadeln und ein paar Garnreste - habe ich schon im Frühjahr entdeckt und nachgearbeitet - in Pam's blog 'Gingerbread & Snowflakes' gibt es die ganze Anleitung!)
Sunday, December 11, 2011
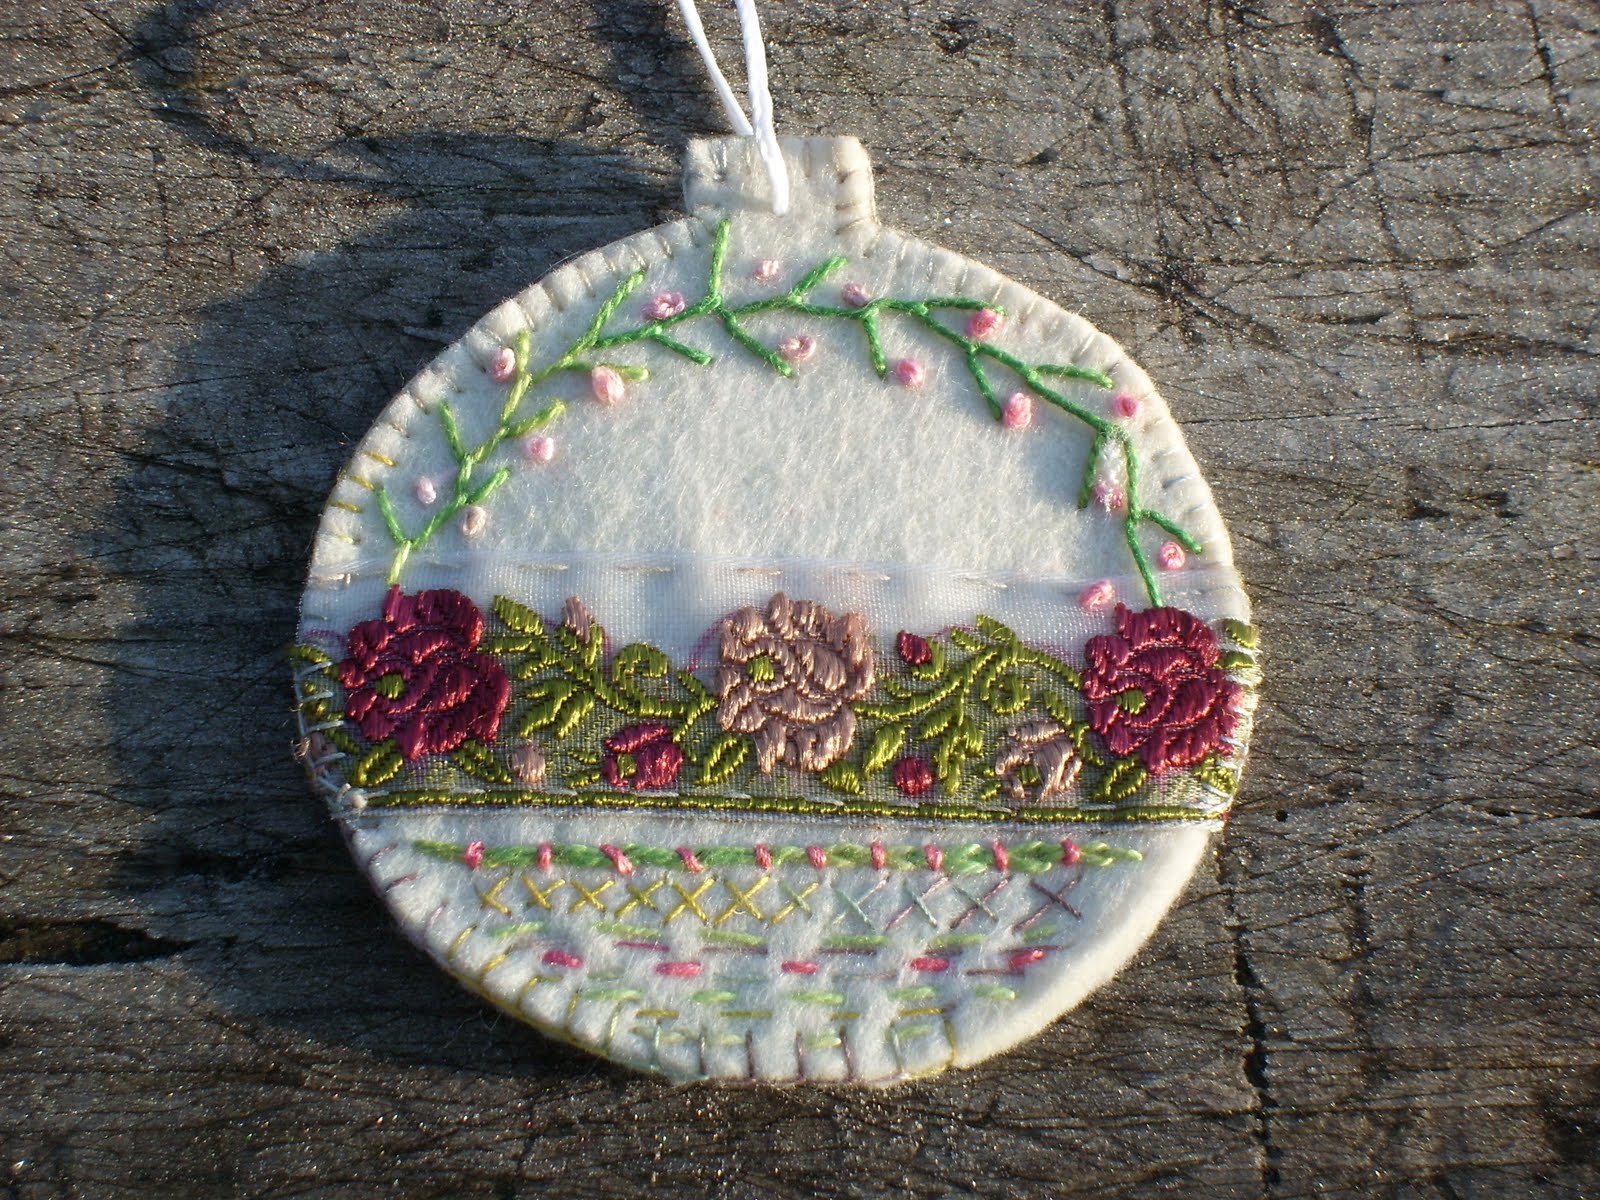
Small Xmas project II: Felt ornament/Weihnachtsprojekt II: Filzhänger
What can you do with some scraps of white felt, bits of ribbons and lace? Well, a Christmas ornament, of course!
The felt I used for this was quite a sturdy one, actually a piece of a table placemat, and so it will hang nicely, no backing needed.
A little bit of ribbon and some handstitching, and it could turn out like this:

For the decoration of the second one I used different bits of lace and sewed them down with free motion machine stitches - but of course you could do it all by hand as well:

I guess there are endless ways of using tablemat felt in various colours for making ornaments - maybe also in combination with paper (what about photos?) or fabric ... could be adapted for a kids' project as well, I think!
(German summary: Ein Stück festen Filz - hier von Tischsets - und Reste von Borten, Bänder und Spitze - und Simsalabim! - hat man einen Christbaumschmuck!)
The felt I used for this was quite a sturdy one, actually a piece of a table placemat, and so it will hang nicely, no backing needed.
A little bit of ribbon and some handstitching, and it could turn out like this:
For the decoration of the second one I used different bits of lace and sewed them down with free motion machine stitches - but of course you could do it all by hand as well:

I guess there are endless ways of using tablemat felt in various colours for making ornaments - maybe also in combination with paper (what about photos?) or fabric ... could be adapted for a kids' project as well, I think!
(German summary: Ein Stück festen Filz - hier von Tischsets - und Reste von Borten, Bänder und Spitze - und Simsalabim! - hat man einen Christbaumschmuck!)
Tuesday, December 6, 2011
Mother Christmas on St Nicholas' Day
Many years ago, when I was visiting London in early December, I stumbled upon a box of Christmas cards which were sold on behalf of charity purpose. The text was a poem called 'Where art thou, Mother Christmas?' by Roald Dahl, and that year, I sent these cards to a lot of my friends.
And almost every year, when I'm busy trying to get all things planned and done (and bought and cooked and crafted and wrapped and decorated and written ...) in time for the feast, I have that poem in the back of my head, just pondering over the fact that tradition show only men bringing the presents, while reality demands most entirely female efforts ...
Nevertheless, here's the text!
Where art thou, Mother Christmas?
I really wish I knew
Why Father should get all the praise
And no one mentions you.
I'll bet you buy the presents
And wrap them large and small,
Then in the end our cunning friend
Pretends he's done it all.
So hail to Mother Christmas,
The uncomplaining slave,
And down with Father Christmas,
That good-for-nothing knave.
(Roald Dahl)
Monday, December 5, 2011
Small Xmas project I: Lavender hearts /Weihnachtsprojekt I: Lavendelherzen

This year I managed to harvest my lavender in time - and I got a whole tray full of the wonderful smelling blossoms to let dry. I did cut up some of the flower stalks as well, as their scent of lavender is just as strong as the blossoms themselves.
Last time when visiting Stockholm, I bought a handprinted linen kitchen towel at 'Svensk Hemslöjd' (a Swedish domestic art & craft shop), with just the right size of red hearts on it. So I cut the hearts out, with a small seam allowance, and sewed them up with a red linen fabric for backing.
When the blossoms and stalks were all dry, I just had to fill them into the fabric hearts and close the opening with a few handstitches.
Finally, I decorated the front with flower motives from a machine lace fabric and some white vintage buttons.

(German summary: Heuer habe ich es geschafft, rechtzeitig meinen Lavendel zu ernten und zu trocknen. Dann habe ich ihn in rote Leinenstoffherzen gefüllt, die ich aus einem handgedruckten Geschirrhandtuch ausgeschnitten und genäht habe.)
Wednesday, November 30, 2011
Another sleeveless vest!/Noch einen Pullunder!
Yes, I enjoy this way of knitting very much - this time, I tried doing a more graphic pattern in a colour scheme which I have never chosen before.
As I'm just knitting strips with quite few stitches at the time, I prefer using (wooden) double-pointed sock needles. The finishing rows at neck and arms are crocheted, and for the waistband I then needed a circular knitting needle, of course.

This vest is actually a de-stasher, as most of the yarn was either found in my stash or reclaimed from another garment - I only bought one single ball of sockwool yarn to get a bit of glowing turquoise into it!

A clever thing about knitting strips is that you don't have to worry about gauge and measurements until you've been knitting for quite a while - then there's still time to layer it onto one of your favourite sweaters and compare sizes.
Another advantage of this piece-work is that you can knit it almost entirely on sock needles - even knitting two strips parallel, if you want. The striping itself helps you count the rows easily when comparing lengths and sewing it all together.
And furthermore, the strips make it possible to re-arrange the design and the order of colours till the very end - you can even turn them upside down before mounting!
(German summary: Mir gefällt diese Art, Streifen zu stricken, sehr gut, da man wirklich bis zuletzt die einzelnen Teile neu arrangieren und ergänzen kann. Die Strumpfstricknadeln machen die Arbeit sehr handlich, und auch das Kombinieren verschiedener Wollreste- und stärken ist hier kein Problem!)
Sunday, November 20, 2011
Bottlecap recycling/Flaschenverschlüsse recyceln
I guess you know me by now - and that I have a faible for recycling things, especially if they come in some form of textile context.
Finding recycling possibilities for beverage cartons/tetrapaks or PET-bottles isn't even that hard - but for quite some time now I've been looking for a good solution on what to do with those bottlecaps.
And finally I've found one - it's provided by Jen Segrest, alias 'verybigjen', who turns them into sweet, tiny pincushions of all sorts - here is the link to her very clear tutorial on flickr.
So below you can see the ones I made - don't you think they would make a nice, small gift for X-mas? Really easy to do and you can use the tiniest of scrap supplies! And - they really come in more handy than you might think: I'm using mine all the time now!

(German summary: Schon lange habe ich überlegt, was man mit den vielen Flaschenverschlüssen machen könnte, die sich so ansammeln. Bei 'verybigjen' auf flickr gibt es eine einfache Anleitung, wie man daraus winzige Nadelkissen machen kann - genial! Vielleicht als ein nettes, kleines Geschenk?)
Tuesday, November 15, 2011
Deep down the dustbin .../Fasermonster-Familie

... there once lived a fiber monster - although I never knew.
One day, it popped out of the bin and layed down under the needle foot of my embellisher.
Then it had a full service beauty surgery and became a bookmark.
Nice, huh?
(German summary: Wer hätte denn gedacht, daß sich ein Lesezeichen-Monster im Papierkorb versteckt? Ein bißchen 'Schönheitschirurgie' am Embellisher, und schon war's geschehen!)
Tuesday, November 8, 2011
Reclaimed wool: Indoor boots/Haussocken aus Recyclingwolle
Another good idea for using your reclaimed wool (or leftovers), is making house boots - a crocheted mixture of socks and slippers, which my daughter and I are using constantly. They are warm, soft and don't get lost under the table - and you can even drop them in the washing-machine from time to time.
For this latest pair of boots I used a reclaimed worsted wool yarn for the base and topped it with some fancy leftovers of fringe yarn - I even decorated them with a dear head which I cut out from a piece of brown felt.

End of summer, I crocheted these two pairs the same way - reclaimed yarn and leftovers again, however in some acrylic wool blends.

As usual, I didn't really have a pattern, but if you zoom up on the pictures, I think you get the idea:
Starting circular at the toes, crocheting a flat round for a couple of rows (put a marker at the beginning, so you can see where a new row starts).
At about 5 cm diam. increase less frequently, thus allowing the flat piece to curl up to a 'bowl' - when the 'bowl' covers your toes nicely (about 32 sts), stop increasing and proceed crocheting in rounds until you reach your ankle (about 13 cm medium female size).
Now leave a gap of about 12 cm in the front and work front and back rows, turning at the gap.
Continue until you've reached your heel (about 12 cm medium female size), split the back by working a couple of short rows to produce a rounded heel. Leave a long tail of your yarn to close up the heel with a few stitches from the inside of the boot.
If you like an open shoe, you could stop here, just crocheting a last row around - but I must say I do prefer crocheting a shaft, making it more like a boot - it looks 'younger' and less Granny-like - and I find it fits better on the foot as well!
So just go on crocheting for about 6 or more rows, skipping the corner stitches on both sides in each round. In the last row, crochet 15 chain sts for a loop at the back - this is great for hanging the boots, for putting them on - and it looks cool, too!

I used a 6 mm crochet hook and either worsted weight yarn or 2-3 strands of thinner yarn - but you take whatever you have and don't feel afraid to try it out!
A good idea would be, however, to divide your yarn into two similar heaps (you can put it on a scale) before you start, and to work both boots more or less simultanously - when you work without a pattern, this is to ensure that both boots will look the same in the end :-)!
(German summary: Noch eine nette und nützliche Art, seine Rest- oder Recyclingwolle zu verwenden, ist Haussocken- oder -stiefel zu häkeln. Das geht sehr einfach: ein Käppchen für die Zehen, dann gerade aus in Runden bis zur Fessel, aufgezogene Sohle in Hin- und Rückrunden bis zur Ferse, Arbeit teilen und ein paar verkürzte Runden häkeln, zusammennähen, Öffnung umhäkeln, bis ein Schaft entstanden ist, kleinen Henkel hinten mittig arbeiten.
Ein guter Tip ist aber, wenn man frei häkelt, daß man anfänglich die Wolle in zwei gleiche Teile aufteilt und die beiden Stiefel mehr oder weniger gleichzeitig arbeitet - damit sie am Ende auch wirklich gleich werden :-)!)
Sunday, November 6, 2011
Reclaimed wool: Sleeveless vest/Pullunder aus Recyclingwolle
I like yarns. And I like repurposing things. So the idea of reclaiming yarn from non-fitting garments laid close at hand.
When I was given two bags full of hand-knitted garments which I didn't want to wear as they were, I decided to unravel them and use the wool for some new projects.
Out of an unravelled shoulder cape, I knitted this sleeveless vest -

I didn't really use a pattern, just knitted strips and sew them together, taking measure from one of my old vests.
I like knitting the front and the back the same - so I can wear it both ways.

When you've unravelled an old garment, it's important that you wind it to a skein, soak it in lukewarm water (I used a bit of soap too), rinse it thorougly and then dry it, eventually with a weight, in order to straighten out the 'curls' of the former knitting. If you don't, your new knitting will get uneven and ugly.
Shake the skeins several times while they are drying, and you will get an airy and fluffy yarn, good as new!
(German summary: Da mir sowohl Wolle als auch Recyling am Herzen liegt, ribbele ich gerne nicht mehr getragene Stricksachen auf und stricke daraus etwas Neues. Wichtig ist, daß man das aufgeribbelte Garn zu Strängen wickelt, und es dann im lauwarmen Wasser - auch mit Seife - badet, dann spült, trocknen läßt - evtl. mit einem Gewicht - damit sich die 'Wellen' glätten und die Wolle wieder ein schönes Maschenbild ergibt. Mehrmals ausschütteln, ausschlagen - und das Garn ist wie neu!)
Saturday, October 29, 2011
A brooch with a face/Eine Brosche mit Gesicht

Now I've used one of my free motion machine stitched faces for a brooch - and as I was listening to a historical audiobook novel while working, I guess it was something of that feeling that influenced my hands here.
The hair is stitched with a thin organza ribbon, the background consists of fabric and wool punched with the embellisher and then embroidered on with my hand-dyed threads.
I sew on a big, coloured safety pin on the backside, as I'm going to use it for holding a shawl in place.
(German summary: Ich habe jetzt eines meiner Gesichter für eine Brosche - oder vielleicht eher Schultertuchspange - verwendet.
Beim Arbeiten habe ich gleichzeitig ein historisches Hörbuch gehört - ich glaube, daß man es auch an dem Gesicht erkennen kann ...)
Wednesday, October 26, 2011
Working on faces/Gesichter sticken

'You can never have too many faces', Jude Hill/Spirit Cloth once wrote in her blog - and that's true.
A face gives your (textile) picture a personality - and makes it tell a story. I learned that when I made 'The Goose Maiden' - and I also realized that I need to do my very own faces.
So I've been working on some faces now - using my new sewing machine and a piece of cloth, which I have sun-dyed with the breakfast teabags and dried walnut skins in a jar on the windowsill.
Even if my new sewing machine is a wonderful improvement to the old one (so quiet! so exact! and with an embroidery foot!), it's not easy to make the faces much smaller than this. And of course it's more of an effort than having them printed - but on the other hand, I like the idea that each one of them is unique, and has a character of its own.
(German summary: Ich habe Gesichter gestickt, mit meiner neuen Nähmaschine, auf handgefärbtem Stoff - und auch wenn sie nicht so klein werden können, wie gedruckte, gefällt es mir sehr gut, daß sie alle ein bißchen eine eigene Persönlichkeit haben!)
Monday, October 24, 2011
The Goose Maiden/Die Gänsemagd

So this is The Goose Maiden - a small wall hanging, different fabrics, wool and ribbons punched with the embellisher, decorated with hand embroidery, beads, sequins and free motion machine embroidery.
When I visited Sara in Alicante earlier this year, she gave me a few printed faces of hers - so yes, this is one of her fabric faces which I've used for the maid. Ah, and the goose itself is actually a painted tin button - you can still get hold on some buttons like these in old Viennese haberdashery shops!
(German summary: Die Gänsemagd - ein kleines Wandbild, daß ich mit dem Embellisher gepuncht und danach mit Hand- und Maschinenstickerei, Perlen und Pailletten bestickt habe. Das gedruckte Gesicht ist von Sara - sie hat mir ein paar von ihren geschenkt - den bemalten Zinnknopf habe ich in einem Wiener Kurzwarengeschäft gefunden.)
Sunday, October 23, 2011
Mongolian Warrior Pullover/Mongolischer Kriegerpullover
At last, at last - I've finally managed to finish that Mongolian Warrior Pullover, which I promised my daughter more than a year (shame, shame!) ago ...

When she saw the design in Nicki Epstein's book 'Knitting On Top of the World', she asked me to knit one for her too - but in black, with just a bit of olive green - and if possible, with detachable sleeves (which is of course not in the pattern), so that she can wear it both as a pullover and as a sleeveless vest/waistcoat.
As I had already knitted a red vest for myself using this pattern, I wasn't that eager to make another one (I hate knitting the same pattern twice!) - but nevertheless I bought some nice wool & bamboo yarn and started on it -


Well, now it's finished, at last! (And when I finally started, it didn't even take that long ...)
For the detachable sleeves, I crocheted a row of single crochet along the outer strips, working some short chains as 'buttonholes' on the shoulders - which you would hardly notice when the sleeves are off. The buttons themselves were spread onto the top of the sleeves.
The buttons on the hips are just for decoration - I thought it would look nice to repeat the brass buttons there, giving it a slightly 'military' touch - well, it is after all a warrior pullover, isn't it?
And - I've got a big parcel from Susa again - wonderful handdyed wool, to knit and to spin -
this one makes me think of an old fisherboat, lying on the shore:

- and the spinning wool (I've already begun spinning it!) - which Susa dyed upon my request, on Wensleydale sheep wool - will become a wonderful, soft 'deep lake in the forest'-sweater ...

(German summary: Endlich habe ich den 'Mongolischen Krieger'-Pullover fertig, den sich meine Tochter schon seit einem Jahr wünscht - wir haben ihn mit abknöpfbaren Ärmeln abgeändert. Und dann habe ich noch wieder wunderschöne, handgefärbte Strick- und Spinnwolle von Susa bekommen - und natürlich schon angefangen zu spinnen ...)
Tuesday, October 11, 2011
Spinning a rainbow/Regenbogen spinnen

I'm spinning again - enjoing the very, very last late summer days with the spinnig wheel outside in the garden - spinning more of that beautiful handdyed wool from Susa (earlier posting here).

It's funny how different a yarn can turn out, depending on the plying thread used. For the rainbow roving, I first used a thin matching thread for plying - and wasn't convinced at all:

So I searched my stash and found a ball of lace yarn (Schoppel Crazy Ball) and plied my rainbow Masham wool once more with that (ah yes, I mixed in some dark blue wool at an end too) - and suddenly, I could really see the rainbow coming through!
Due to the different colour sequences in the plying yarn, there were exciting new colour combinations - made me think of the Hundertwasser colour scheme here and there -

The next is a very light-coloured Cheviot roving, which I'm planning to use for a plain Victorian lace shawl - I'm plying it with a vintage rosé silk thread (one more of those rayon silk threads dated 1936 which I found in my mother's cellar a couple of years ago!) It will be a gift for a friend of mine.


And for the last one, a Falkland wool - the colours are deeper and more 'cloudy' in real! - I've spun it in a soft thick & thin manner, plying it with two skinny wool threads.
I'm not sure what to knit out of this yet - it's very fluffy and delicate, so it would be quite suitable for some kind of shoulder shawl too - and even if I already have some, I still adore those kind of wraps now that the nights are getting colder ...

Of course, I'm not a spinning artist like Jana, who I admire very much indeed - but at least I'm beginning to feel that I'm getting closer to controlling the spinning wheel (and not vice versa :-) - and that I can at least roughly make it produce the yarn I'm aiming at. I'm so glad I bought that wheel and just kept on trying until it worked out!
(German summary: Ich spinne wieder - wunderbar gefärbte Wolle von Susa - und freue mich, daß ich damals das Spinnrad gekauft und einfach so lange herumprobiert habe, bis ich annehmbar spinnen konnte - es ist so eine Freude!)
Monday, October 3, 2011
Pixel Patchwork Project/Modernes Pixel-Patchwork
What if one was to combine a pixel pattern with patchwork?

When I held the latest issue of the French magazine 'Marie-Claire Idées' in my hand and saw this beautiful work, it seemed to me like a rather new and exciting approach on patchwork:


Still, this would mean a lot of time and fuzzy, tiny patchwork pieces, each to be sewn down with a 5 mm seam - real miniature work - which I'm not up to at the moment.
So I decided to simplify both the pattern and the technique - aiming at that fabric pixel effect, but in a more 'malfatto' way ... faster, easier - and not too exact. :-)
In one of my cross-stitch books, I found this somewhat smaller rose pattern - with not too many colours.


As there are three different reds (and one pink) in this pattern, and I wanted to use the scraps available, I sorted the red ones in three colour 'families', instead of using the same fabric allover for one specific shade of colour. - This is an experiment on the go, so we will see how it turns out in the end!
Then I started cutting up suitable fabric scraps into 3 x 3 cm pieces - using a roller cutter and a cutting mat. Some of the thin or fraying fabrics needed to be doubled with a thin iron-on-vylene.
For guidance, I drew up a 3 x 3 cm grid with a pencil directly on the background fabric and sprayed it lightly with a temporary positioning glue.

I worked the pattern in smaller segments, bonding the squares with a zig-zag seam and then attaching a new piece of background fabric, when the first had been completed.
It's almost like laying a jigsaw puzzle!
(German summary: Pixel patchwork - die Idee an sich aus einer Zeitschrift, allerdings habe ich sie etwas abgewandelt, um ein schnelleres und nicht ganz so aufwendiges Ergebnis zu erreichen. Ich verwende einen Haftspray und nähe anschließend die 'rohen' Quadrate mit Zick-zack direkt auf den Untergrund fest.)
When I held the latest issue of the French magazine 'Marie-Claire Idées' in my hand and saw this beautiful work, it seemed to me like a rather new and exciting approach on patchwork:


Still, this would mean a lot of time and fuzzy, tiny patchwork pieces, each to be sewn down with a 5 mm seam - real miniature work - which I'm not up to at the moment.
So I decided to simplify both the pattern and the technique - aiming at that fabric pixel effect, but in a more 'malfatto' way ... faster, easier - and not too exact. :-)
In one of my cross-stitch books, I found this somewhat smaller rose pattern - with not too many colours.


As there are three different reds (and one pink) in this pattern, and I wanted to use the scraps available, I sorted the red ones in three colour 'families', instead of using the same fabric allover for one specific shade of colour. - This is an experiment on the go, so we will see how it turns out in the end!
Then I started cutting up suitable fabric scraps into 3 x 3 cm pieces - using a roller cutter and a cutting mat. Some of the thin or fraying fabrics needed to be doubled with a thin iron-on-vylene.
For guidance, I drew up a 3 x 3 cm grid with a pencil directly on the background fabric and sprayed it lightly with a temporary positioning glue.
I worked the pattern in smaller segments, bonding the squares with a zig-zag seam and then attaching a new piece of background fabric, when the first had been completed.
It's almost like laying a jigsaw puzzle!
(German summary: Pixel patchwork - die Idee an sich aus einer Zeitschrift, allerdings habe ich sie etwas abgewandelt, um ein schnelleres und nicht ganz so aufwendiges Ergebnis zu erreichen. Ich verwende einen Haftspray und nähe anschließend die 'rohen' Quadrate mit Zick-zack direkt auf den Untergrund fest.)
Wednesday, September 28, 2011
Chopping up shirts/Mit Hemd, Pullover und Krawatte ...
Although end of September, it's still warm outside, so I can work in the garden.
I'm chopping up four men's shirts which I found at the parish flea market last weekend. One of the shirts is solid natural linen - mmm, this means lots of embroidery fabric ...
The other ones are heavy cotton - I chose them for the texture and for the faded colours. Maybe they would work well as a frame for my deer project?

I also have some broad men's neckties in my stash - and when using my little bias former/tape maker (Prym) the other day, I suddenly remembered that most ties are cut diagonally - what if I'd use them for making unusual bias bindings? They could look quite nice - and it would be repurposing and at the same time saving time and effort, when I don't have to prepare those fabric strips first ...

I bought a big mens' sweater at that flea market too - the price was 1 Euro! It's 75% cotton and the colours are off-white with a touch of brown inbetween, machine knitted in stockinette, the yarn consisting of three threads - two of them are straight cotton, the third one is a bit of a moderate bouclé.
As the seams are cut and overlocked, unravelling means getting a lot of ends - which is quite bad for knitting, but good for sewing. The straight natural white/light beige cotton threads will give me loads and loads of threads to handsew with - it's the perfect colour and the perfect thickness!

So, what are you waiting for, ladies? Hubby's not around? Where are those scissors ...?
(German summary: Am Flohmarkt habe ich einige feste Herrenhemden billig erstanden - guter Stoff, gute Farben - zum Nähen, Embellishen und Sticken - dann noch die Idee, aus alten, breiten Krawatten Schrägbänder zu nähen - und die einzelnen Fäden eines Baumwollpullovers für's Handnähen zu verwenden ...)
Thursday, September 22, 2011
New start into autumn/Neuer Herbstanfang
Crisp, foggy mornings and red apples hanging sweet and shiny from the trees in my garden ... This year's Indian summer slowly turns into autumn and I realize it's been quite a while since last, dear friends ...
But it's been a great summer, warm and sunny, with friends and family visiting, some of them for several weeks. I've done a bit of this and that inbetween - maybe I'll show you some of those projects later on.
Things have happened: Elizabeth at Landanna is back blogging with fresh inspiration - Sara has moved to Argentina and told me in a mail, that there are lots of interesting textiles to see in Buenos Aires - Clare has visited a free-hand machine embroidery workshop and will certainly come up with new projects on that - and in other blogs, I've seen a lot of beautiful natural dyeing experiments, which look very exciting.
I think we are blessed to have this medium to share and inspire one another.
Two days ago, I received a very much longed-for, late big-birthday present from my Dad: a new sewing machine, a Bernina 350, to replace my still-working, but 50-year-old Singer. (Men understand the point better if you remind them that cars have improved a bit too during the last 50 years ... ;-).
I'm overwhelmed with this wonderful, new tool - and today I started playing with it, using the darning and quilting foot, exercising on a dog print fabric I had at hand:


The picture to the right shows the back - I think it looks rather funny too, almost like a newspaper comic!
Here's another one:


I did a couple of free-motion flowers as well - maybe for a greeting card - using an automatic machine pattern for the border:


And of course I had to try out free-hand writing on the machine too!

There are some books on this subject that might interest you:
- "Free & easy stitch style" by Poppy Treffry
(German title: "Das etwas andere Nähbuch")
- "Scandinavian Stitches" by Kajsa Wikman
(also known as Syko: www.syko.typepad.com)
- The "Impatient embroiderer" by Jane Emerson
(German title: "Einfach maschinensticken")
- "Textile Natur/Textile nature" by Elsbeth Nusser-Lampe
(German and English text)

And while working, I had this somewhat crazy idea to simply colour some white thread with markers to get striped and dotted thread ... Of course this is more convenient to use for hand-sewing, as you will have to renew the pattern from time to time, when unravelling the upper layer - but it's fast and easy and it even looks decorative on the shelf!

(German summary: Herbstanfang und Neuanfang. So viel Neues gibt es bei euch, liebe Blogfreundinnen - schön, daß wir dieses Medium zum Austausch haben. Ich habe seit ein paar Tagen eine neue Nähmaschine und spiele jetzt vor allem mit der Freihandstickfunktion - einige Buchtipps zum Thema, drei Titel davon auch auf Deutsch - und eine verrückte Idee, mit einem Edding das Nähgarn auf Zebra zu trimmen :-)
Subscribe to:
Posts (Atom)
