Showing posts with label fabric. Show all posts

Monday, December 5, 2011

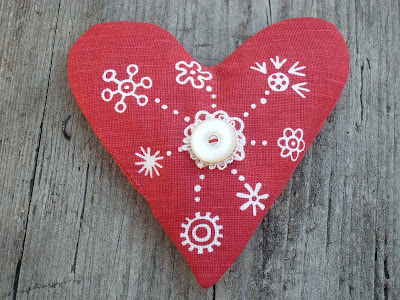
Small Xmas project I: Lavender hearts /Weihnachtsprojekt I: Lavendelherzen


This year I managed to harvest my lavender in time - and I got a whole tray full of the wonderful smelling blossoms to let dry. I did cut up some of the flower stalks as well, as their scent of lavender is just as strong as the blossoms themselves.

Last time when visiting Stockholm, I bought a handprinted linen kitchen towel at 'Svensk Hemslöjd' (a Swedish domestic art & craft shop), with just the right size of red hearts on it. So I cut the hearts out, with a small seam allowance, and sewed them up with a red linen fabric for backing.

When the blossoms and stalks were all dry, I just had to fill them into the fabric hearts and close the opening with a few handstitches.

Finally, I decorated the front with flower motives from a machine lace fabric and some white vintage buttons.


(German summary: Heuer habe ich es geschafft, rechtzeitig meinen Lavendel zu ernten und zu trocknen. Dann habe ich ihn in rote Leinenstoffherzen gefüllt, die ich aus einem handgedruckten Geschirrhandtuch ausgeschnitten und genäht habe.)

Wednesday, September 28, 2011

Chopping up shirts/Mit Hemd, Pullover und Krawatte ...

Although end of September, it's still warm outside, so I can work in the garden.

I'm chopping up four men's shirts which I found at the parish flea market last weekend. One of the shirts is solid natural linen - mmm, this means lots of embroidery fabric ...

The other ones are heavy cotton - I chose them for the texture and for the faded colours. Maybe they would work well as a frame for my deer project?


I also have some broad men's neckties in my stash - and when using my little bias former/tape maker (Prym) the other day, I suddenly remembered that most ties are cut diagonally - what if I'd use them for making unusual bias bindings? They could look quite nice - and it would be repurposing and at the same time saving time and effort, when I don't have to prepare those fabric strips first ...


I bought a big mens' sweater at that flea market too - the price was 1 Euro! It's 75% cotton and the colours are off-white with a touch of brown inbetween, machine knitted in stockinette, the yarn consisting of three threads - two of them are straight cotton, the third one is a bit of a moderate bouclé.

As the seams are cut and overlocked, unravelling means getting a lot of ends - which is quite bad for knitting, but good for sewing. The straight natural white/light beige cotton threads will give me loads and loads of threads to handsew with - it's the perfect colour and the perfect thickness!


So, what are you waiting for, ladies? Hubby's not around? Where are those scissors ...?

(German summary: Am Flohmarkt habe ich einige feste Herrenhemden billig erstanden - guter Stoff, gute Farben - zum Nähen, Embellishen und Sticken - dann noch die Idee, aus alten, breiten Krawatten Schrägbänder zu nähen - und die einzelnen Fäden eines Baumwollpullovers für's Handnähen zu verwenden ...)

Friday, June 3, 2011

A lacey deer/Spitzenhirsch


Well, this is definitively a lacey deer - different bits and scraps of lace sewn onto the fabric print ( here is where the deer story began). This time I added a couple of transparent glass beads which I found in my stash as well.

I'm beginning to wonder how I can assemble these experiments to some kind of a unit - in one of the comments, Sara suggested that I'd make a quilt out of them - but as my wall space is very limited, I think I'd rather mount them vertically somehow, like for a long, narrow wall-hanging. But maybe still in a 'quilty' way ... Any ideas?

(German summary: Ja, ein Spitzenhirsch, aus kleinen Spitzenresten, die ich auf dem Stoffdruck (hier hat es angefangen) aufgenäht habe. Jetzt überlege ich hin und her, wie ich diese Serienexperimente zu einer Einheit zusammenfügen kann ... etwas schmales, langes ... irgendwelche Ideen?)

Sunday, March 27, 2011

Sewing a fabric basket out of scraps/Ein Stoffbehälter aus Resten

The idea of sewing storage bags out of scrap fabric is not new - but still brilliant, and I wanted to try that out. As you can see, I even added some pockets to the outside, which can hold pens and all sorts of tools.


The only thing you need is fabric and/or scraps which you sew together, maybe on a larger piece of waste cloth - and some kind of batting: in this case I recycled an old mat from my ironing board, but instead of buying new interlining you could f.e. make use of a worn-out sweater, a towel or a thin blanket - or several layers of fabrics you want to get rid of :-).

A pair of old jeans would make a wonderful big basket for toys or even fire wood, I think!

Anyway, you should end up with a rectangular piece of scrap fabric, fold it in the middle and sew the short ends together to receive a kind of broad pocket.

The trick about producing a basket or a bucket out of this is to sew a seam in a right angle across the edges to achieve a bottom - this is also often used to get that third dimension to bags of all kinds.

If you feel you need a solid pattern to do this, you can buy one from one Etsy (one example is designsmayamade, who makes them out of burlap and with handles) - and if you just want the buckets without having to sew yourself, I suggest you visit the shop of roxycreations.

(German summary: Mir gefällt die Idee sehr gut, aus Stoffresten auch Behälter nähen zu können - Behälter kann man ja immer brauchen. Der Trick ist, einfach die Ecken großzügig im rechten Winkel abzunähen, um einen Boden zu bekommen - ähnlich wie auch bei Taschen aller Art.)

Friday, February 11, 2011

DIY Washi Tape/Selbstgemachtes, buntes Klebeband

Sometimes there is such an easy solution to a new 'need' ...

After having seen the Japanese washi tape in various oversea online-shops, I wanted some of that colourful tape myself too - but as so often, the shipping costs are exorbitant.

So how could I make a similar tape myself?

When visiting a construction/DIY market lately, I realized I might use a double-sided sticky tape (the thin, cheap one, is just perfect for this purpose). And it works! You can use it either for paper - wrapping paper, newspaper, mulberry-, decoupage-, photos - whatever paper you like - or for light to medium weight fabric, or bits of trims and ribbons ...

Lay out your paper or ironed fabric backside up on the table, unroll a bit of the double-sided tape and gently press it down, avoiding wrinkles, unrolling more of the tape as you go. Cut it off in a manageable length.

Now you can either use a roller cutter or craft knife and a metal ruler to cut the tape lengthwise in the strip dimensions you prefer - or you could keep the width of the double-sided tape and just cut off short strips from there whenever needed.

A toilet tissue roll and a paper clip will keep your fancy tape organized.

(On the second photo, the two larger rolls to the left are actually self-adhesive wall paper borders which I found at a bargain - but they work as tape as well!)

(German summary: Eine einfache Art, buntes Klebeband selber zu machen, ist, dünnes, doppelseitiges Klebeband mit Stoff/Stoffbänder oder Papier jeglicher Art zu verbinden - dann entweder der Länge nach in dünnere Streifen schneiden und auf Papierrollen aufwickeln - oder bei Bedarf Stücke von dem breiten Klebeband abschneiden.)

*** I'm off for a week now - winter holidays at school - going to Sweden to see my family! ***

Saturday, February 5, 2011

Crisp organza blossoms/Frische Frühlingsblüten - aus Organza

This weekend, there was a bit of spring in the air ... the sun was coming out and temperatures are rising!


Maybe you are familiar with the technique already, but I was delighted to discover I could easily make these romantic flowers myself with scraps of organza and a few beads.

You cut out small circles, about 4-6 cm in diameter, freehand and irregular, as they come, start with 10 pieces or so - then light a candle.

For extra safety, you might want to put the candle on top of a tin box and place it in the kitchen basin - and then you just scorch the edges of your organza circles. The brims will melt and the fabric curles up a bit - just perfect for your flower petals.

Gather your petals with a piece of thread, stitching through the center - keep it irregular for a more natural look - and add a single or a group of spare beads.

(If you take a look here, you'll find a YouTube tutorial on this and many more links for other kind of fabric flowers.)

(German summary: Ein bißchen ist hier jetzt schon der Frühling zu spüren - ich habe mich gefreut, als ich ein Tutorial über diese Organzablüten gefunden habe!

Einfach 4-6 cm große Kreise aus Organza schneiden, die Ränder an einer Kerzenflamme ansengen - sicherheitshalber beim Waschbecken arbeiten - dann ca 10 Blütenblätter mit einem Nähfaden in der Mitte zusammenheften, ein paar Perlen mittig annähen - fertig!)