Showing posts with label sewing. Show all posts

Sunday, February 26, 2012

Sustainable everyday favourites

As I'm always looking for sustainable everyday items myself, I thought I'd share some of the things I've found and use in everyday life with you. And I would love to learn about your favourites!

Almost every evening, I light my recycling candle - it has a permanent glass fiber wick and is fed with scraps of wax and candle leftovers. (Here is the link to the manufacturer.)


The soap foam pump is another one of my favourites: with only a very small amount of any liquid soap - and a lot of water from your cold water-tap - it produces soft soap foam, nice to your skin, nice to the environment and nice to your wallet.


Two months ago I stumbled upon this link and this other link and decided to try out sewing and wearing my own fabric panty liners. I admit I was a bit sceptical at first, but now - after several weeks of use - I sure am a believer: wonderful to wear, easy to sew, and a very good, sustainable alternative to the disposables ones.

(If you don't want to sew yourself, there are several sellers at Etsy who'll do the job for you - here's the link.)


While recycling your old flannel sheets and shirts for the panty liners, you can use the fabric scraps for making your own cotton rounds as well - when used, I simply throw them in a small laundry bag hanging in a corner of the bathroom, and wash them together with the towel and bed linen laundry.


(Of course there are sellers for these things too at Etsy, if you don't feel like sewing and recycling yourself.)

(German summary: Da ich immer selber auf der Suche nach nachhaltigen und umweltfreundlichen Alltagsdingen bin, wollte ich hier meine Favoriten vorstellen - welche sind Deine?)
Monday, December 5, 2011

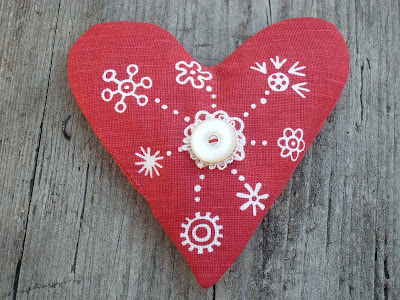
Small Xmas project I: Lavender hearts /Weihnachtsprojekt I: Lavendelherzen


This year I managed to harvest my lavender in time - and I got a whole tray full of the wonderful smelling blossoms to let dry. I did cut up some of the flower stalks as well, as their scent of lavender is just as strong as the blossoms themselves.

Last time when visiting Stockholm, I bought a handprinted linen kitchen towel at 'Svensk Hemslöjd' (a Swedish domestic art & craft shop), with just the right size of red hearts on it. So I cut the hearts out, with a small seam allowance, and sewed them up with a red linen fabric for backing.

When the blossoms and stalks were all dry, I just had to fill them into the fabric hearts and close the opening with a few handstitches.

Finally, I decorated the front with flower motives from a machine lace fabric and some white vintage buttons.


(German summary: Heuer habe ich es geschafft, rechtzeitig meinen Lavendel zu ernten und zu trocknen. Dann habe ich ihn in rote Leinenstoffherzen gefüllt, die ich aus einem handgedruckten Geschirrhandtuch ausgeschnitten und genäht habe.)

Sunday, November 20, 2011

Bottlecap recycling/Flaschenverschlüsse recyceln

I guess you know me by now - and that I have a faible for recycling things, especially if they come in some form of textile context.

Finding recycling possibilities for beverage cartons/tetrapaks or PET-bottles isn't even that hard - but for quite some time now I've been looking for a good solution on what to do with those bottlecaps.

And finally I've found one - it's provided by Jen Segrest, alias 'verybigjen', who turns them into sweet, tiny pincushions of all sorts - here is the link to her very clear tutorial on flickr.

So below you can see the ones I made - don't you think they would make a nice, small gift for X-mas? Really easy to do and you can use the tiniest of scrap supplies! And - they really come in more handy than you might think: I'm using mine all the time now!


(German summary: Schon lange habe ich überlegt, was man mit den vielen Flaschenverschlüssen machen könnte, die sich so ansammeln. Bei
'verybigjen' auf flickr gibt es eine einfache Anleitung, wie man daraus winzige Nadelkissen machen kann - genial! Vielleicht als ein nettes, kleines Geschenk?)

Monday, October 3, 2011

Pixel Patchwork Project/Modernes Pixel-Patchwork

What if one was to combine a pixel pattern with patchwork?


When I held the latest issue of the French magazine 'Marie-Claire Idées' in my hand and saw this beautiful work, it seemed to me like a rather new and exciting approach on patchwork:


Still, this would mean a lot of time and fuzzy, tiny patchwork pieces, each to be sewn down with a 5 mm seam - real miniature work - which I'm not up to at the moment.

So I decided to simplify both the pattern and the technique - aiming at that fabric pixel effect, but in a more 'malfatto' way ... faster, easier - and not too exact. :-)

In one of my cross-stitch books, I found this somewhat smaller rose pattern - with not too many colours.


As there are three different reds (and one pink) in this pattern, and I wanted to use the scraps available, I sorted the red ones in three colour 'families', instead of using the same fabric allover for one specific shade of colour. - This is an experiment on the go, so we will see how it turns out in the end!

Then I started cutting up suitable fabric scraps into 3 x 3 cm pieces - using a roller cutter and a cutting mat. Some of the thin or fraying fabrics needed to be doubled with a thin iron-on-vylene.

For guidance, I drew up a 3 x 3 cm grid with a pencil directly on the background fabric and sprayed it lightly with a temporary positioning glue.


I worked the pattern in smaller segments, bonding the squares with a zig-zag seam and then attaching a new piece of background fabric, when the first had been completed.

It's almost like laying a jigsaw puzzle!

(German summary: Pixel patchwork - die Idee an sich aus einer Zeitschrift, allerdings habe ich sie etwas abgewandelt, um ein schnelleres und nicht ganz so aufwendiges Ergebnis zu erreichen. Ich verwende einen Haftspray und nähe anschließend die 'rohen' Quadrate mit Zick-zack direkt auf den Untergrund fest.)

Thursday, September 22, 2011

New start into autumn/Neuer Herbstanfang

Crisp, foggy mornings and red apples hanging sweet and shiny from the trees in my garden ... This year's Indian summer slowly turns into autumn and I realize it's been quite a while since last, dear friends ...

But it's been a great summer, warm and sunny, with friends and family visiting, some of them for several weeks. I've done a bit of this and that inbetween - maybe I'll show you some of those projects later on.

Things have happened: Elizabeth at Landanna is back blogging with fresh inspiration - Sara has moved to Argentina and told me in a mail, that there are lots of interesting textiles to see in Buenos Aires - Clare has visited a free-hand machine embroidery workshop and will certainly come up with new projects on that - and in other blogs, I've seen a lot of beautiful natural dyeing experiments, which look very exciting.

I think we are blessed to have this medium to share and inspire one another.

Two days ago, I received a very much longed-for, late big-birthday present from my Dad: a new sewing machine, a Bernina 350, to replace my still-working, but 50-year-old Singer. (Men understand the point better if you remind them that cars have improved a bit too during the last 50 years ... ;-).

I'm overwhelmed with this wonderful, new tool - and today I started playing with it, using the darning and quilting foot, exercising on a dog print fabric I had at hand:


The picture to the right shows the back - I think it looks rather funny too, almost like a newspaper comic!

Here's another one:


I did a couple of free-motion flowers as well - maybe for a greeting card - using an automatic machine pattern for the border:


And of course I had to try out free-hand writing on the machine too!


There are some books on this subject that might interest you:

- "Free & easy stitch style" by Poppy Treffry
(German title: "Das etwas andere Nähbuch")

- "Scandinavian Stitches" by Kajsa Wikman
(also known as Syko: www.syko.typepad.com)

- The "Impatient embroiderer" by Jane Emerson
(German title: "Einfach maschinensticken")

- "Textile Natur/Textile nature" by Elsbeth Nusser-Lampe
(German and English text)


And while working, I had this somewhat crazy idea to simply colour some white thread with markers to get striped and dotted thread ... Of course this is more convenient to use for hand-sewing, as you will have to renew the pattern from time to time, when unravelling the upper layer - but it's fast and easy and it even looks decorative on the shelf!


(German summary: Herbstanfang und Neuanfang. So viel Neues gibt es bei euch, liebe Blogfreundinnen - schön, daß wir dieses Medium zum Austausch haben. Ich habe seit ein paar Tagen eine neue Nähmaschine und spiele jetzt vor allem mit der Freihandstickfunktion - einige Buchtipps zum Thema, drei Titel davon auch auf Deutsch - und eine verrückte Idee, mit einem Edding das Nähgarn auf Zebra zu trimmen :-)

Sunday, June 26, 2011

Literally modern times/Klassische Literatur modern

Question: How do you get your kids off the computer and into reading classical literature instead?

The answer is simple: You buy them an e-book reader and make them a nice cover for it! (Bold decision for me, being a part time librarian!) But indeed, my daughter spent several hours today out in the garden, reading ...

And for the homemade cover: this is the front -


- and here's the back (usable the other way round as well):


And for a young mister, I made a wristband this weekend out of a piece of an used truck tyre and some old adjustable resistance out of my stash - quite cool recycling, isn't it ? (Do you now begin to imagine what my stash looks like ;-) ...)


(German summary: Und wie bekommt man seine Kinder weg vom Computer und hin zur klassischen Literatur? - Man kauft ihnen ein e-book reader und bastelt ihnen eine hübsche Hülle dafür ... Bei uns war's auf jeden Fall ein voller Erfolg! Ein Armband aus einem gebrauchten LKW-Reifen und einem alten einstellbaren Widerstand gab dieses Wochenende dann auch her.)

Saturday, June 4, 2011

The return of the Moosepaper Elk /Wiedersehen mit dem Zeitungselch

Before I'm starting with the assembling, I just wanted to show you how the 'Folkloristic Reindeer' and the 'Japanese Moosepaper Elk' turned out when finished (the beginning of it was here and here):


Anke at Wolle/Natur/Farben gave me some nice ideas in her comment on my last posting, Sara mentioned a quilt - and I myself feel that I would like to try some ragged piecing ... maybe combined with some embellishing - well, we will see what there will be when inspiration finally strucks me :-).

(German summary: Ich wollte nur schnell die beiden fertiggestellten Tiere zeigen, bevor ich mich ans Zusammenfügen mache ...)

Friday, May 20, 2011

It's just another cat, my deer!/Raubtierhirsch

Funny enough, it seems as if the scrappiest of scraps boost my imagination the most!

This is today's deer, where I had to assemble three outline patches (and even add a bit of additional drawing) to achieve one animal.


Here you can see the three fragments joined:


I found a piece of wildcat fabric in my stash and decided to use it for the body.


Then I took a clear plastic envelope for tracing the outlines - this way I could see where to position the eye best:


The beads on neck and back are not only embellishments, but also help holding the fabrics together.

And as I seem to be in a creative upswing right now, I made this ring for myself today as well - it's basically a piece of black rubber, some natural beads (coral and bone) and a platinum covered metal bar with a removable knob.


(German summary: Je anspruchsloser die Reste, umso mehr wird anscheinend meine Experimentierlust angestachelt! Drei Reststücke und etwas Raubtierstoff bilden heute das Gerüst meines neuen Hirsches - dann noch ein paar Perlen und Metallpailletten für's Geweih ... Ja, und der Ring kam heute auch noch zustande: Gummi, Naturperlen und ein Steg mit abschraubbaren Verschluß.)

Wednesday, May 18, 2011

Oh deer! Fabric Wildlife/Rotwild im Musterwald

A friend sent me some scraps of a cotton fabric, which had the outlines of different deers printed on it.

And like in a drawing book, these outlines just asked to be filled in with colour ...

I chose strands of cotton threads and some light weight fabrics from my stash palette - the pictures show work in progress, of course.


Furthermore, these gorgeous linen-blended wool strands are hand-dyed by Dornröschen and now waiting for me in a basket beneath my spinning wheel ...


And - I've bought myself a new pair of shoes ... running gear, almost like walking barefoot!


(German summary: Die Konturen dieses Stoffes haben richtiggehend nach Farbe und Inhalt gerufen - ich verwende Moulinégarn und dünne Stoffreste dazu. - Spinnfutter von Dornröschen - diesmal eine neue Mischung, mit Leinen! Und dann habe ich mir noch ein paar neue Schuhe gekauft ... fast wie barfuß laufen!)

Sunday, May 15, 2011

Stitching flowers/Blumenstickerei


I've done a bit of stitching again lately - actually it's a combination of different techniques:

first, I used my embellisher to needle-felt some scraps of different novelty yarns to the pre-felted green background, then I did some embroidery on it, partly with woolen threads, partly with hand-dyed cotton ones - then I used my embellisher on it again - and finally I added a couple of fabric mini yo-yos, which I made out of fabric scraps and then sew on to the center on some of the flowers.

I'm not yet quite sure how to proceed with this - maybe I'll use it for a book cover.

(German summary: Ein kleines Werkstück mit einer Kombination verschiedener Techniken - Trockenfilzen mit dem Embellisher, Handstickerei und ein paar Mini-Rosetten, die ich mit dem Yo-yo-maker gemacht habe - der Hintergrund ist ein Stück grüner Vorfilz.)

Monday, May 9, 2011

Pin cushion ring/Fingernadelkissen


I made a great invention today ... a pin cushion ring! (Yes, I know, there might be others - but this is mine! :-)

The idea struck me when I was about making a pin cushion on a jam jar - as a matter of fact, I am one of the few persons out there who has hardly got any decent pin cushions, although I sew regularly, both by hand and on the machine.

And when I'm sitting outside in my garden, sewing or embroidering, I never know where to put those cut-offs - don't want to throw them on the ground, neither put them in my coffee cup ... Therefore I need the jar: first to hold thread and scissors, then to collect the cut-off threads and fabric snippets.

Both pin cushions were glued on with a hot glue gun - one to the jar lid, the other one to a simple copper ring I had laying around.


And while working, I thought I could as well make a third one - it's a personal version of the flower pin cushion, I just added an extra cushion on the top, in order to separate the sewing needles from the normal pins.

(German summary: Und ich dachte, ich hätte eine neue Erfindung gemacht, mit dem Fingernadelkissen ... :-)! Auf jeden Fall habe ich jetzt sogar drei verschiedene Nadelkissen parat - jedes erfüllt seinen besonderen Zweck auf unterschiedlicher Weise.)

Sunday, May 8, 2011

A Japanese Knot Bag/Eine japanische Knotentasche

I found a nice vintage fabric in my stash recently, and decided to sew one of those Japanese knot bags out of it.


For the lining, I used a scrap piece of striped cotton fabric, which had been in my stash for ages at well.

I'm quite pleased with how it looks, but as the vintage fabric I used is rather heavy, I think I'm going to make the long strap a bit more narrow so that it will be laying smoother on my shoulder.


I would also like to make another one, lengthening the strap to reach diagonally over the chest and using a medium weight cotton fabric instead.

If you would like to sew a knot bag yourself, the pattern I found when googling about it is here - the explications are in German, but with clear pictures and a scale pattern. You'll find a smaller 'handbag' version with instructions in English here.

(German summary: So, jetzt habe ich mir auch eine japanische Knotentasche genäht - ein genial einfacher Schnitt, geringer Stoffverbrauch - man könnte auch Reste zusammennähen - und sehr praktisch!)

Saturday, April 23, 2011

Happy Easter!/Frohe Ostern!


I'm back from a very interesting visit to Sara and her daughter Sophie in Alicante - and as this is holiday time, I just want to wish you a Happy Easter and a very nice Spring week-end!

I made this fast Easter bunny above with a pattern I found at Allison's blog - here is her free pdf-download in English and German.

Although my bunny looks like if it was knitted in form, it's actually sewn out of an originally knitted and then felted knitting sample.

(German summary: Ich bin zurück aus Spanien und wünsche euch allen Frohe Ostern und ein schönes Frühlingswochenende! In Allison's blog gibt's das schnelle Hasenmuster auf deutsch und englisch!)

Sunday, April 10, 2011

Fusing plastic/Plastik schmelzen

What I've been experimenting with lately is: fusing plastic.

Basically, what you need are plastic bags, a pair of scissors, an ironing board, an iron and some parchment paper.

Place your ironing board where you have a good ventilation (there could be fumes), cut the bags into flat sheets (cut off handles, bottom and one of the side seams), sandwich three layers of plastic between parchment paper (to protect iron and ironing board), put your iron on a medium heat and keep the iron moving on the sandwiched layers for about two minutes - turn the 'sandwich' and repeat from the other side as well.

Different kind of plastic bags behave differently, so you will have to experiment a bit with the heat and the time you keep ironing. What you want to achieve is that the surface of the bags is melting to the point of being fused - without shrinking too much or producing holes in the plastic - adjust the heat accordingly.

Let your fused sheet cool down, tear off the upper parchment paper gently and decide whether to add strips of new plastic here and there for hiding holes or wrinkles, for reinforcing or just for design reasons.

About 3-6 layers of plastic are to recommend - the thickness depends on what you want to use it for.

I decided to sew a fancy wallet, or money-bag, out of my fused plastic, using a ebook-pattern I bought from 'ki-ba-doo' at DaWanda (similar to Etsy) a while ago.

The fused plastic is very durable - still you can sew it like a fabric, using velcro strips or snap fasteners for closure. I think it's quite a cool material to work with ;-) and there are certainly a lot of projects I can think of using this ...!


(German summary: In der letzten Zeit habe ich mit dem Schmelzen von Plastiksackerln experimentiert - ein cooles Material, das sich wie Stoff weiterverarbeiten läßt und gleichzeitig sehr strapazierfähig ist! Wichtig: gute Belüftung und unbedingt das Plastik zwischen Backpapier legen, um Bügeleisen und Bügelbrett zu schützen!)

Sunday, March 27, 2011

Sewing a fabric basket out of scraps/Ein Stoffbehälter aus Resten

The idea of sewing storage bags out of scrap fabric is not new - but still brilliant, and I wanted to try that out. As you can see, I even added some pockets to the outside, which can hold pens and all sorts of tools.


The only thing you need is fabric and/or scraps which you sew together, maybe on a larger piece of waste cloth - and some kind of batting: in this case I recycled an old mat from my ironing board, but instead of buying new interlining you could f.e. make use of a worn-out sweater, a towel or a thin blanket - or several layers of fabrics you want to get rid of :-).

A pair of old jeans would make a wonderful big basket for toys or even fire wood, I think!

Anyway, you should end up with a rectangular piece of scrap fabric, fold it in the middle and sew the short ends together to receive a kind of broad pocket.

The trick about producing a basket or a bucket out of this is to sew a seam in a right angle across the edges to achieve a bottom - this is also often used to get that third dimension to bags of all kinds.

If you feel you need a solid pattern to do this, you can buy one from one Etsy (one example is designsmayamade, who makes them out of burlap and with handles) - and if you just want the buckets without having to sew yourself, I suggest you visit the shop of roxycreations.

(German summary: Mir gefällt die Idee sehr gut, aus Stoffresten auch Behälter nähen zu können - Behälter kann man ja immer brauchen. Der Trick ist, einfach die Ecken großzügig im rechten Winkel abzunähen, um einen Boden zu bekommen - ähnlich wie auch bei Taschen aller Art.)

Sunday, March 20, 2011

Scandinavian wrist warmers with tin thread embroidery/Skandinavische Pulswärmer mit Zinnfadenstickerei

Another deep dive into my stash ... and what I found this time was some curly sheep fur, some tin thread, bone, metal and glass beads, and some small pieces of fulled cloth - very, very soft, probably with angora ...

I just couldn't resist sewing these small bits together to wear as wrist warmers!


I used another bit of sheep skin - also very soft and this time without curls - as an appliqué for the leaf, then couched the tin thread with a silver metal thread for the borders of the leaf.

Tin thread embroidery - which is a couching stitch - has a long tradition in Scandinavia, often used by the Sami people on reindeer skin. The 'naked' sheep skin I used here has the right 'look', I think.


The red borders, which I layered in between while sewing, are just waste cut-offs - but I found them being most decorative for this project!

The wrist warmers are not lined with the fur - I only had very narrow strips of it (waste material as well), which i sew under the edges to complete the Scandinavian touch!

(German summary: Noch ein paar Schätze aus meinem Fundus - diesmal entstanden ein paar Pulswärmer aus den Walkstoffresten, Pelzstreifen, Zinnfäden und Perlen!)